
Method feeders for carp fishing can be a gratifying way to catch all sizes of fish. No matter how stocked the lake you are fishing is, you could be rewarded heavily with some nice fish using this method. Method feeder fishing is one of my favourite ways to catch big carp, but it does take a good bit of effort and knowledge.
Method feeder fishing involves packing bait around a method feeder with a rig attached to the end with your chosen hook bait (I usually choose a pre-tied hair rig for convenience). No matter what time of year it is, you should always have time to rig up that method feeder and give it a bash; you never know it could lead to that trophy fish lurking in the waters.
How to fish with a method feeder?
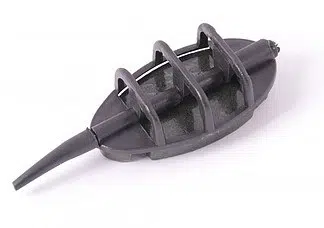
A method feeder is a specialised piece of equipment made in varying shapes and weights to allow bait such as micro pellets or ground bait to be moulded around it. When you cast into your swim, the bait will fall to the bottom of the lake and then slowly break up and surround your hook bait with freebies for the hungry carp. Opt for a feeder that comes with a mould as it will keep the weight the same every cast, which will help improve accuracy as the same power will be needed every cast.
Method feeders come in varying weights, but I rarely use anything under 25g. A 25g feeder will give you enough weight to rocket your bait accurately to far features but can also be controlled easily for casting to close margins. A 25g feeder will ensure your feeder is fixed firmly on the lake bed if you are casting to a slope, so your hook bait will stay over your patch of bait.
You will have a rig tied to the end of your method feeder with an irresistible hook bait at the end (how this is attached will vary depending on the feeder, but ill show you what I like to use).
When method feeder fishing, ill look for critical areas the carp are most likely to be hanging out. In the warmer months, I’ll usually choose to fish along the edges of reed beds, up close to islands on the water (if there are any) or gaps in between lily pads. If you are new to fishing, id maybe avoid trying to cast to problematic areas such as gaps in lily pads, as this could only lead to frustration and a lot of lost feeders. During the winter and colder months, the carp are more than likely hiding in the deeper water, so if you are fishing a stocked small lake, ask the owner or other anglers where the deep spots are. Or, if this is not possible, make an educated guess; you can always cast to different areas if your first choice is not producing any fish.
I’ll suggest sticking to your chosen swim for at least an hour and a half but if you don’t have as much as a nibble, make a change. If you have no action within the first two hours, the carp are likely not in the area.
Once you’ve picked your swim, place your hook bait attached to the hook at the bottom of your mould, fill with your mix and push the feeder into the mould (ill go over how to make the perfect mix further down the post) and cast it out.
When you first arrive or choose a new swim, I’d advise you to recast regularly, around every 10-15 minutes, so you can get a nice build-up of bait in the area to attract the carp in and keep them there. After about five casts, extend this time to around every half hour (set a timer if you need to), but don’t be impatient and stick to this time.
Whether you choose pellets or ground bait, it is essential to ensure your mix is made to the right consistency. If it’s mushy, the bait will stick to the feeder even at the bottom of the lake. This is what you want to avoid as the carp won’t be able to come in and eat this ball of mushy very easily.
Micro Pellets
In the colder months, ill opt for micro pellets, usually 3mm. Micro pellets (when mixed properly) will break down easily in the colder waters and will be ideal for the picky carp at this time of year.
Right now, onto the mixing part. For this, I use quite a large bait box, one with small holes in the lid, and fill it half full with pellets. This will be the first thing I do when I arrive, so it gives the pellets time to prepare when I am rigging up. I then cover the pellets with water from the lake, put the lid back on tightly, turn it over and shake like fu#k.
Keep shaking until no or only drops of water come out of the small holes on the top. I’ll then put the box on the ground upside down and continue rigging up my rods and the rest of my equipment. When you are all set up your pellets should be ready (usually about 15 minutes).
I’ll always test them out before diving in and moulding them around my feeder. Pick out a small handful, squeeze them together and drop them into the margins. If they break up instantly when they hit the water, your pellets are too dry, so add a little more water and repeat the process.
If they don’t break up after a few minutes, they are too wet and mushy, so leave them to dry out a little longer or add a sprinkle of ground bait to soak up some of the excess water.
If you follow these simple steps, your micro pellets will be perfect every time.
Ground Bait
Mixing ground bait can be a little more tricky to get it perfect. For this, you’ll need a round mixing bowl and a container or spare bait box to have the water in. Pour the ground bait into your round bowl and add a little water. Don’t go wild with the water and only add little bits at a time. Now get your hands involved and start mixing thoroughly. Keep adding small amounts of water and mixing well until your ground bait is fluffy and holds together nicely after you squeeze it.
If your ground bait becomes a solid ball after you squeeze it, you have added too much water. If this is the case, add some more ground bait and mix again to dry it out slightly.
If your ground bait starts crumbling after you squeeze it, then added slightly more water.
Like the micro pellets, make sure and run a test before you start loading it onto your feeder. Squeeze together a small ball, drop it into the margins, and watch how it reacts in the water. If it breaks up immediately after hitting the water, then it’s too dry. It would be best if you were aiming for it to sink to the bottom intact and then start to break up as it rests on the bottom.
What Rig to use

When I fish, ill usually opt for a pre-tied hair rig. This is mainly down to convenience, as you can quickly whip it out of the packet attach it to your feeder and you’re ready to go. As easy as that! Hair rigs will provide great presentation as your bait is not stuck right onto the hook. It also ensures your bait is less likely to fall off in casting, which could result in wasted time waiting for a fish to take the bait that’s not still on there.
The size of the hook will depend on what size of carp you are targeting, but a size 10 or 12 hook will be ideal for the typical UK sized fish. Opting for a hook of this size will mean the hook is lighter, and the fish is less likely to reject it as it sucks up your bait. Smaller hooks are generally sharper, so this will help with hooking more fish and keeping them on there.
A rig of around 4 inches long is perfect when fishing the method feeder as this keeps your hook bait over your patch of bait that was attached to your feeder, so your hook bait is guaranteed to be in the same area.
What hook bait to use
There are many hook baits you can opt for, from boilies to corn to large pellets. Choosing what hook bait will be most effective on the day can be tricky. You never really know what the carp will fancy eating from day to day. A few pieces of imitation corn can be highly productive throughout the year. Imitation corn is a fake piece of corn. Imitation corn will stay on your hair rig better and won’t come loose very easily.
Boilies are also a favourite for a lot of anglers. They come in many sizes and “flavours”, and I’d always recommend having a decent selection. When it comes to what sizes of boilie to use, id recommend 8-10 mm for fish up to 10 pounds. 12-15mm for fish up to 20 pounds, and if you are targeting anything over this size, opt for a larger boilie of 18mm or bigger. That’s not to say a big fish won’t eat the smaller boilies, but I’d suggest following this as a general rule.
Make sure you have a good selection of different flavours and types of hook bait so you can switch if you aren’t getting any bites. You never know what the carp are after on the day.
Try it!
Now you should have a general understanding of how to utilise the method feeder to catch all sizes of fish, and I can guarantee it will provide a lot of fun on the water hence why it’s my favourite method all year round. You will need to stock up on some supplies if you are getting started. You’ll need:
- 25 or 30 gram Method feeders (make sure you have a few as there’s always the chance you will snag and loose some or snap off on a monster fish
- 3mm micro pellets if you are fishing in the colder months (don’t worry, they are still effective in warmer months too)
- A few bags of good ground bait (have a look at some reviews to choose an effective mix)
- A large bait box to mix micro pellets (make sure it has small holes in the lid or make some so you can follow the mixing steps I’ve provided- trust me, it works!)
- A round mixing bowl for ground bait if you choose to use it
- 4-inch hair rig hook lengths with a size 10 or 12 hook
- A selection of hook baits
Of course, you will need a good carp rod and reel and if you don’t have a rod yet, have a read at my carp fishing rod post so you have an idea of what you should be looking for. I hope you have enjoyed this post and have taken away a lot of valuable information and tips to get method feeding for yourself. If you have any questions or anything to add, please leave a comment below, and il be sure to get back to you; now, fish!